Showing posts with label informative. Show all posts

Saturday, February 11, 2012

How To Be Creative

"I wish I could do stuff like that, but I just don't have an ounce of creativity in me!"

That is a phrase that I hear all too often. Is that you? Well, my hope with this post is to change your mind on that one.

It is my personal belief that creativity is something everyone has and it's sort of like a little muscle. Like any other muscle in your body, you have to use it and take care of it if you want it to grow and be strong. Also like any other muscle in your body, you have to start small and take it slow with your work outs if you don't want to burn it out and exhaust it.

Here are a few tips pulled from my own experience when working with creativity (both of mine and of others'). Hopefully they can help to rekindle that little spark of creativity within you as well!


ONE: CREATE THINGS


This one may seem redundant but it's like I said earlier. You have to exercise that muscle if you want it to get stronger. Sometimes it's not enough to just sit around all day and think up grand ideas. You have to actually get your hands dirty in order to "exercise" and get more creative. The more you create, the more it will empower you, boost your confidence, and give you experience to build off of.

So get to it. Any little thing will help. Try freewriting. Write something new everyday, like in a journal or something. Doodle on every scrap you ever lay eyes on. Get some scissors and glue and collage the crap out of an old magazine. Make lists about everything: projects you want to do, things you want to experience before you die, places you want to go. Force yourself to think and force yourself to get a little something done every day. Before you know it that daily little something will be a big, beautiful something.

Oh, and be a scientist. Experiment with things. Delve into things you've never tried before and see what happens.

TWO: EASY DOES IT


Also, like I said earlier, you have to start small and take it slow. You wouldn't want to try benching hundreds of pounds on your first try if you've never before lifted a weight in your life. You also wouldn't want to try painting the next Mona Lisa if you've never before held a paintbrush in your life. It's okay, you can even start with finger paints for goodness sake. You've got to start somewhere, so start somewhere basic. Just play with the colors, see what happens when you mix red and yellow. Who cares? Maybe something neat will happen. Then you'll want to keep going. Then maybe something even neater will happen! But whatever you do, take on projects that you know you can finish.

If you aim too high, it's all too likely that you'll get discouraged and easily bored of a project because it is just too daunting. It's happened to me way too many times. I get really excited about a really big project that I've started and I don't let myself take a break. Then I get tired of it because it's too hard and it's taking too long. So then it gets shoved to the back of the closet and forgotten forever. Don't do this to yourself. Just take it nice and easy!

THREE: GET INSPIRED


I read somewhere once that there is no original idea. No matter what you do, it's probably already been done before. Now, obviously this isn't always the case. But the point was that it's okay if you don't come up with a completely original idea because there is always room for improvement. If it's not original, just do it better, make it your own.

So go for it. Look around you and get inspired by things you see. Your ideas don't all have to be born out of nothing in the deep, dark depths of your own head. Take the best bits and pieces of all that you see and put them all together. When you see something you like, ask yourself: "What is it about this that I love and what would I do different to make it perfect for me?"

FOUR: BE A GOOD SPORT


So maybe that thing you just made is hideous and completely non-functional. Whatever, just laugh at it and keep going! Don't be a sore loser. Go back to your list of "Projects You Can And Will Finish" and start the next thing on the list. Or go browse around and see if you find anything that sets off a light bulb in your head, a way to fix your latest oops.

Just don't blame your supposed lack of creativity for a disappointing end result. Everything you create, whether it be pretty or ugly, is more experience under your belt. Have the courage to keep going. You'll be glad you that you did!

FIVE: DE-SCREEN YOURSELF


This might be the most important piece of advice I can give. Turn off your TV. Step away from the screen. Eliminate media from your life as much as possible. Screens suck you in and spit you out, making you wonder where all your time went. And what was it wasted on? "Reality" television?

Go outside. Talk to people. Walk in nature. Experience actual reality. It will open your mind in ways you never would have dreamed. It's amazing what this seemingly simple shift in your life can do for you. It will give you so much time and so much freedom within your own mind. It will pave the road for your creative chariot to charge down.


Now go forth and create! Every single thing you create is a piece of your soul, manifested in the world for all to see and feel. Immerse yourself in your creations and share them with anyone and everyone. Have fun!

Thursday, December 1, 2011

Gingermelon Patterns


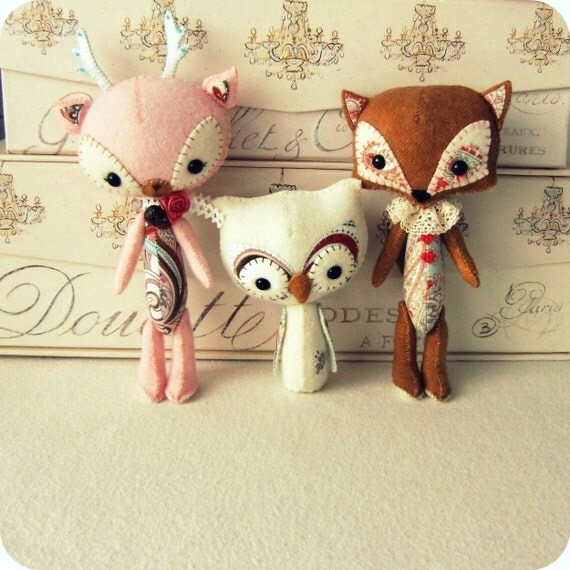
I purchased the pattern for this adorable little Woodland Owl at Gingermelon's Etsy shop. The pattern came in a PDF format and included illustrations and lots of good instructions. My little owl isn't exactly perfect, but it's been a while since I've picked up a needle and thread. Bear with me here!

I just had to share because I am so in love with this little guy! I have been sewing non-stop for all the little ones in my family ever since. Literally...non-stop...

Shelly has lots of beautiful patterns in her shop. My favorites include the Woodland Deer, Owl, and Fox, obviously, and also this precious little sleepy Lullaby Lamb. Also, the Parkland Stufflings (a Bunny, Raccoon, and Squirrel) are just too adorable!

All the patterns include 100% hand-sewn directions and are simple to make. If you feel like getting your sew on, then go check out Gingermelon! The patterns are very inexpensive and suitable for all levels of sewers, not to mention they are WAY TOO CUTE.

By the way, Shelly did NOT pay me to write this. I am just totally in love with her products.

Here are some images from her shop:


Sunday, November 20, 2011

Playing With Blocks

Blocks are such a simple toy. But doesn't it always seem like the simplest things are able to entertain your baby more than any number of flashy, noisy, blinky, battery-eating toys can anyway?

Stacking blocks is great for motor development. Your baby will slowly learn how to manipulate objects with his or her hands. Stacking blocks on top of one another will teach your baby how to be careful and deliberate.

But not only should you encourage your baby to stack the blocks on top of one another; you should show your baby how much fun it can be to knock down a tower, too! This will make it less discouraging for your baby if she is trying to build a tower, but it keeps falling over. She may even stack blocks more eagerly simply for the sake of being able to knock them down!

Try to see what else your toddler can come up with to do with the blocks. Adrianne loved taking a block in each hand and smacking them together to make a nice rhythm.

She also likes to dump out her box of blocks so that she can put them all back in the box. Don't discourage your baby from doing things like this, even if it just seems like making a mess to you. Your baby is learning and growing with every action. Let your baby experiment! After all, babies are the world's greatest scientists, always testing, observing, and discovering.

Tuesday, November 15, 2011

Fear Of Releasing On The Potty: The Bathtub Method

Well, now that I can pretty much say that Adrianne is "potty trained," I feel the need to make a post dedicated to the one and only struggle we ran into throughout the whole process. The reason is because of how extremely difficult it was for me to find any information on the subject whatsoever.

What I did find, however, was a whole lot of moms and dads pleading for help over the internet on the same issue. So I feel it's important to address, for the sake of all those parents out there who need some help.

"She knows when she has to go to the bathroom, but when she sits on the potty she grunts and strains trying to hold it in. She even runs around the house crying because she has to pee so bad but no matter what, she won't do it. Now she is just leaking everywhere because she is past her holding point, but she just can't release on the potty!"

Is that you up there?

That was me while I was potty training Adrianne. She was showing all the signs of readiness. And she was obviously physically ready because she could hold it in for hours! I was so scared and exhausted from chasing her around, trying to get her to pee, that eventually I did the ultimate no-no: I put a diaper on her. That's when I knew I was in trouble, though, because she still would not go pee. She wanted to give up diapers like a big girl, I guess. But it only made me feel even more lost and confused.

Let me tell you, it's not easy watching your baby suffer like that without having a clue what to do. I know what that's like. But I also know that giving up and switching back to diapers is not necessary. At least not until you try this. Backing off of potty training when your toddler is showing the signs of readiness will only send mixed signals and make potty training more difficult when you return to it later on.

Instead, try the bathtub method. This is the solution I came up with in my desperation, and I read afterwards somewhere of a few other people using this method. It worked like a charm for us, when nothing else did. Here is what you do:

Put your baby's potty chair inside the bathtub and run the warm water. Sit your baby on the potty and use a cup to pour the water on your baby's feet and ankles. The sound of the water and the feeling of it will help to force your baby to relax and pee on the potty chair.

With Adrianne, the first time we did this, she strained and whined for a good two minutes even with the water on her feet before she finally couldn't hold it any longer. I could tell immediately that she had gone because her legs went from rigid, trembling boards to soft and relaxed, just like that.

After the first time, the time it took for her to relax after the water hit her toes went down to nothing by the end of the next day.

However, for a week or so, Adrianne would still insist on being in the bathtub to go potty. If your baby does this as well, don't worry. Let her take her time. Eventually, you will be able to slowly ween your baby out of the bathtub. Start by placing the potty chair next to the tub while running the water. Adrianne was completely able to pee without running water and without being in the bathtub within a week or two of starting potty training altogether. This method was a miracle for us.

If you don't have a bathtub that you can put the potty chair in, perhaps you can try CAREFULLY putting the potty chair on the counter next to the sink and doing the same thing. Just make sure you hold on to both the potty and your baby and make sure there are no falling accidents. Or you can try maybe using a large bowl full of warm water in front of the potty chair on the floor and use a cup to pour the water on your baby's feet and make the pouring water sound.

Good luck and please feel free to contact me if you have any questions. I will do my best to help you.

Saturday, November 12, 2011

Pregnancy: Month 3


Your body: You will probably begin to notice your belly getting bigger now. Your clothes may feel a little snug, or you may even be able to feel a slight bump in your lower abdomen. Try to keep in mind though, that you should not be gaining too much weight. Even though you may be eating for two, number two only needs a couple hundred extra calories. If you find you've accidentally gained a little more than a few pounds by this point, don't panic. Just try to eat a little more consciously.

It's also possible that you've lost weight. This is not a big deal unless your doctor brings up a concern. Most likely, if you have been trying to eat healthier for the sake of the baby, this could be the cause of your weight loss.You'll want to make sure you get enough calories though to gain enough weight by the end of your pregnancy.

Your baby: Teeny little baby organs are still working hard at developing. Not only that, but baby teeth and fingernails are also starting to grow! The digestive system is really taking shape this month. Your baby's intestines should be moving into place and stomach juices will be forming.

Baby is just about 3 inches in length by the end of this month!

Sunday, November 6, 2011

Pregnancy: Month 2

Your body: Bloating will most likely continue if you have been experiencing it. This may lead to constipation and *shudder* gassiness.

You will also most likely begin to experience "morning sickness" if you are going to at all. Morning sickness can happen at any time, not just in the morning. Try to eat small meals frequently throughout the day and light snacks in between to help with the nausea. Avoid foods that seem to make you queasy often like the plague and steer clear of bad smells, which can make your nausea worse. Ginger is a common stomach soother that may help you when you're feeling queasy. Also, having a small, light, carb-y snack just before you go to bed may help to keep your morning sickness at bay so you can get a good sleep.

You may also start to feel the effect of those wacky pregnancy cravings everyone keeps talking about. On the other hand, you may feel pretty strongly against having certain other foods. It's fine to listen to your cravings and anti-cravings, just so long as you don't start craving anything weird like dirt (I'm serious!). If you do, tell your doctor right away.

Your baby: Your baby is still growing like crazy in there! By the end of the month, he or she will be transformed from a tiny ball of cells to a tadpole-like little embryo with the beginnings of a face, a heart and circulatory system, limbs, and other important vital organs. Much of your baby's growth will occur in the brain.

Also, by the end of the month, your baby will start to make jerking movements! Of course, you won't be able to feel them for quite a while. But it's still cute to imagine!

Go To Month 3 ->

Friday, November 4, 2011

Pregnancy: Month 1

Note: I'm going to start a series of posts dedicated to providing informative tidbits about pregnancy in a month-by-month fashion. If you are pregnant, I hope you can enjoy! By the way, the drawings are by me, so please be nice and don't steal them. I trust you.

Congratulations on your pregnancy! Here is a brief explanation of what you may be feeling and how your baby is developing.

Your body: As your fertilized egg implants itself, you may experience implantation spotting somewhere around a week after conception. You may also begin to notice some bloating and more frequent urination.

More than likely, though, you won't be feeling too much just yet. Well, you know, other than anxiousness as you wait until you may be able to take that pregnancy test. Nope, right now, it's just the waiting game!

One of the biggest obstacles I encountered with my pregnancy was terrible fatigue. This is extremely common, and it makes sense too. Think about it. Your body is building another human being! That takes a lot of energy!

If the fatigue hits you early on, here are a few things you can try to do to help:

  • Make sure you drink plenty of water. This always helped to perk me up, way better than coffee ever could (which you should be avoiding now that you're pregnant). Dehydration can cause fatigue and it can also cause premature labor. So keep this in mind throughout your entire pregnancy. Drink water!
  • Get some light exercise regularly. You may not guess it, but a little bit of physical activity can actually energize you. Go for a brisk walk or pick up a prenatal workout routine.
  • Get the best sleep you can. You really want to make up for the sleep you'll be missing out on in nine months. So turn in earlier if you need to, but make sure you're getting your full night's sleep.
  • Go easy on yourself. Of all times, this is the best time to give yourself a break. You deserve it! So don't overdo it.

Your baby: At this point, you've just conceived and your baby will transform from fertilized egg to blastocyst (bundle of cells that will travel down your fallopian tubes) to embryo (the finally implanted bundle of cells that will soon be a bundle of joy in your arms). What a great start!

Once this happens, your little bundle of cells will divide into a baby half and a placenta half, which is the part connected to you that will deliver your baby its nutrients through the umbilical cord.

Your little embryo is developing fast! So make sure you are taking your prenatal vitamins already to support that healthy growth from the beginning.

Go To Month 2 ->

Friday, October 14, 2011

An Intro to Photography

So maybe I'm not a photo professor. Doesn't mean I can't share with you what I know in a way that is actually comprehensible! Photography has a lot of confusing jargon involved with it. My goal here is to explain it to those of you with a desire to give photography a try, but no time for long, boring lessons or classes on what the heck an F-stop is and what the best way to compose a shot is. So let's get started!

((I have a SONY digital camera with a pretty small lens and I'm just going to assume you have a similar camera for the purpose of this tutorial. It's nothing fancy at all, but it sure is a lot nicer than a tiny little Kodak Easyshare. What you're looking for, if you aren't sure the difference I'm talking about, is one of those big heavy cameras with a lens you can actually turn to zoom in with. We don't want to use a little portable mini digital camera because they usually don't have the functions we'll be talking about here. Of course, you can still take some pretty decent pictures with them, but for now we are going to learn about the functions of the camera that effect exposure and stuff like that.))

RULES FOR BEGINNERS

Rule #1: Never use a flash. Ever. All it does is make your photos look tacky. It will create ugly glares on surfaces that wouldn't normally appear as shiny and cause big bulky and unnatural shadows in the backgrounds of your pictures. Camera flashes also cause things such as red eye. It's better to avoid using a flash until you begin learning more advanced uses for it.

Rule #2: If you do have a small digital camera without the big fancy lens, never use the zoom function. All it does is ultra-crop the picture, basically. It gives you a grainier picture and makes your image shake like crazy.

Rule #3: Never use fancy in-camera editing features. If you want to edit your pictures (including making the photo black and white), then do it digitally on the computer afterwards.

HOW TO HOLD A CAMERA

One of the biggest challenges in photography is to get a clear photo that has little to no motion blur whatsoever. If you have a tripod, then that is excellent. Tripods are a sure way of getting a steady shot without blur because they don't shift or breathe like you do. An even more guaranteed way of getting a steady shot with a tripod is to use a timer function on your camera so that even your finger pushing the button won't have a chance to shake the camera.

If you don't have a tripod, though, it's a different story. There is a proper stance to shooting a picture to help yourself to not shake too much when shooting a picture.

When holding a camera, always hold the bulk of it (the grip) with the hand you use to press the button to take the picture so that your finger can easily reach the button. Then, always use your other hand to hold the lens of the camera from the bottom. This supports the camera and improves its balance, as the lens is very heavy.

Tuck your elbows in close to your body to help keep them from shaking or moving. If you are able to kneel, rest your elbow on your knee for added support, as I am doing in the picture to the left.

When standing, stand with your feet about shoulder width apart to help yourself stand firmly and steadily.

HOW TO COMPOSE A PHOTO
Elements of a good photograph composition:

One: No clutter. This is extremely important. Having a lot of things in the frame of the shot is very distracting for the eye. Zoom or crop (later on the computer) the frame so that you can eliminate as much from the picture as possible that does not directly add to the visual appeal of the shot. To do this, identify the main subject of your photograph. It could be a person or a tree, for example. Focus on that and try to make sure nothing is on the sides or background that could distract your viewer from the main subject.

For example, if you are trying to shoot a person and there is an ugly garbage can a few feet away, either tell your subject to move over so you can cut the garbage can out of the frame or move yourself to a different perspective. Or perhaps there is a tree standing directly behind your subject. In a photograph, it could end up looking like the person in the picture has a tree growing out of the top of their head. Eliminate this problem by again moving either the subject or yourself.

Two: Good lighting. Have you ever taken a picture, maybe of your family members huddled together in a heartwarming embrace, that would have been beautiful if it weren't for the fact that they just ended up looking like big shadows with the sun glaring and messing up the picture from the background?

Being mindful of the source of light will help you to eliminate the problem of awkward shadows or dark spots, especially if you are outside. The reason your loved ones turned into shadows in the above mentioned photo is because the light (the sun) was coming from behind them. This made it overly bright in the background, causing the camera to react to very high amounts of light and causing your subjects to appear dark. If the sun had been behind you and facing your subjects instead, they would have been beautifully lighted and there would no longer have been a horrible sun glare.

Lighting mindfulness is also important inside with artificial lighting, etc. Try to pay attention to the way the light casts shadows on your subject. Having a light source pointing directly at your subject will eliminate a lot of the shadows, while having a light source from the side, maybe even slightly behind, would create an interesting shadow on the front of your subject. Where to put your subject or how to change the light source's position will depend on what you want out of the shadows in the shot.

Three: Creativity. A plain old photograph could easily be transformed into a work of art by simple tweaking of your mind's eye. You could take a photograph of a person standing in the middle of your frame, head on in front of you. Or you could take a photograph of a person standing a little over to the left from a low angle, which would make the shot much more interesting.

Luckily, trying to eliminate things like poor lighting and clutter as previously discussed can sometimes force you to come up with interesting and creative ways of shooting a photograph.

The best thing for improving your skill at this is to look at other photographs. Look at really great photographs to see how they composted the shots and what elements they used to their advantage. Also look at really bad photos to see if you can think of anything that would have made that shot better. Other than that, just experiment! You'll figure out what works best and you'll learn how to feel out what would make a good composition on the spot. It just takes practice and effort.

TECHNICAL THINGS

I want to talk briefly about things like shutter speed and aperture. They are important, even if you use an auto setting on your camera.

When it comes to photography, light is key. The reason photographs are possible is because light reflects of images into the lens. So the amount of light let into the camera is essential. The more light that goes into the camera, the brighter the photograph will be. There are a few different aspects of a camera that will help you to control this amount of light.

Shutter Speed: Your camera has a tiny shutter inside that opens and closes when you snap a photo. When the shutter opens, it is letting light into the camera. It doesn't take much light to create a photograph. If your shutter speed is very fast, the shutter will open and close within a tiny fraction of a second. If you are in a very bright room or if you are outside on a sunny day, this will be more than enough to generate a clear, bright photograph. However, if you are in a dim room or if you are outside at night, this will be way too fast to let in a good amount of light, causing your photograph to be dark and grainy.

Your camera should tell you what your shutter speed is somewhere, probably on the top of your screen. It will appear as a number, either a fraction like 1/30 or a whole number like 4". This number represents the length in seconds that your shutter will be open. So a shutter speed of 1/30 would mean that the shutter will be open for a thirtieth of a second (this is a relatively fast shutter speed) while a shutter speed of 4" would mean it would stay open for 4 seconds (this is a very slow shutter speed).

The rule of thumb is: If it's bright out, use a fast shutter speed. If it's dark, use a slow shutter speed.

KEEP IN MIND: The slower your shutter speed is, the greater the chance you have of capturing motion blur! Use a tripod or increase the lighting.

Aperture: Your camera's aperture is like a pupil. You know how the pupil of your eye opens and closes based on how much light you are exposed to? An aperture is exactly like that. It is a series of blades that create either a smaller or a wider hole through which light can come through into the camera. The size of this hole is measure in F-stops, which will look like "f5.6," "f8," etc. The smaller the F-stop is, the wider your aperture is. So the smaller number will always let in more light than the higher number.

The reason you have both of these things to let in more or less light (shutter speed and aperture) is because aperture also affects depth of field. In other words, a wide aperture will make objects in your frame that are not in focus much blurrier, while a small aperture will keep things that are far away or out of focus more clear. This is helpful if you are taking a photograph outside and you want to keep, say a bunch of mountains in the background nice and clear.

ISO: The ISO has to deal with the sensitivity of your camera to light. This is less of an important thing with digital cameras, which can have an auto-ISO setting most of the time. With film photography, the film is what has the ISO and the higher the ISO, the more sensitive the film is.

If you have a digital camera, you can play around with all of these settings to get a feel for what they all do. But you can also put a lot of these functions on auto until you're brave enough to start manual photography. It might be easier to practice composition and things like that before you get into the technical stuff. Either way, now you know a little bit about photography. You're one step closer to being a professional!
Related Posts Plugin for WordPress, Blogger...
Top Mommy Blogs - Mom Blog Directory